
MCP Server
Connect AI assistants to Precog using the Model Context Protocol.
Tip: Connect any AI tool to
https://studio.precog.com/mcpand pick your agent when you sign in. Your AI Assistant's Chat Setup page has per-client setup instructions and a per-agent URL if you want to pin a client to one agent.
The Model Context Protocol (MCP) is an open standard that lets AI assistants interact with external tools and data sources. Precog runs an MCP server for each organization, giving AI tools direct access to your workspaces, sources, destinations, and pipeline health.
Supported Capabilities
Once connected, your AI assistant can interact with your Precog workspace through a set of MCP tools that cover:
- Workspace & infrastructure — List workspaces, data sources, destinations, and pipelines
- Pipeline health — Check recent run history, sync errors, and data freshness
- Dataset discovery — Browse available datasets and get recommendations for unsynced data
- Organizational context — Store, search, and retrieve business terminology and definitions
- Team visibility — View organization members and roles
The specific tools available may change as the product evolves. Your AI client automatically discovers the current tool set when it connects.
Authentication
Precog's MCP server supports two authentication methods depending on your use case:
- OAuth 2.1 — For interactive clients like Claude Desktop, Cursor, and GitHub Copilot. The client handles the OAuth authorization flow automatically — you just provide the server URL and sign in when prompted.
- Machine Client Credentials — For automated or server-to-server access (scripts, CI/CD pipelines, custom integrations). You create a machine client in the admin panel and use the standard OAuth 2
client_credentialsgrant to obtain an access token.
Setting Up Machine Client Credentials
If you need programmatic access without an interactive sign-in flow:
- Open your organization in Precog
- Navigate to Settings → AI Assistants → MCP Clients
- Click Create Machine Client and give it a descriptive name
- Copy the Client ID and Client Secret — the secret is only shown once at creation time
To obtain an access token, make a POST request to the token endpoint:
curl -X POST https://app.precog.com/api/mcp/oauth/token \
  -H 'Content-Type: application/x-www-form-urlencoded' \
  -d 'grant_type=client_credentials&client_id=YOUR_CLIENT_ID&client_secret=YOUR_CLIENT_SECRET'
The response includes a Bearer token you can use in subsequent API requests.
Pre-registered OAuth Clients
Some platforms — such as Microsoft Copilot Studio — do not support Dynamic Client Registration. For these platforms, you register an OAuth client in Precog ahead of time and use the resulting credentials when configuring the platform's MCP connection.
Pre-registered clients authenticate via client_secret_post during the standard OAuth 2.1 authorization code flow and support refresh tokens for long-lived sessions without requiring users to re-authenticate.
To register an OAuth client:
- Open your organization in Precog
- Navigate to Settings → AI Assistants
- Select the AI Assistant you want to connect
- In the OAuth Clients card, click Register Client
- Enter a Client Name (e.g., "Copilot Studio") and one or more Redirect URIs provided by the platform you are connecting
- Click Register
After registration, you will see the Client ID and Client Secret. Copy both values — the secret is only shown once and cannot be retrieved later.
You will use these credentials when configuring the external platform's OAuth settings. See the Microsoft Copilot Studio section below for a complete walkthrough.
Connection URL
Connect to:
https://studio.precog.com/mcp
This one URL works for every AI Assistant you have access to. You choose which assistant to connect when you sign in, so there is nothing to look up before you start.
Each assistant also has its own per-agent URL. Either URL works — use the single URL for the quickest setup, and per-agent URLs when a client should be pinned to a specific agent or connect to several agents at once.
Choosing an Agent
When your client first connects, it opens a browser window for you to sign in to Precog. After signing in, the consent screen asks which agent the client should connect to:
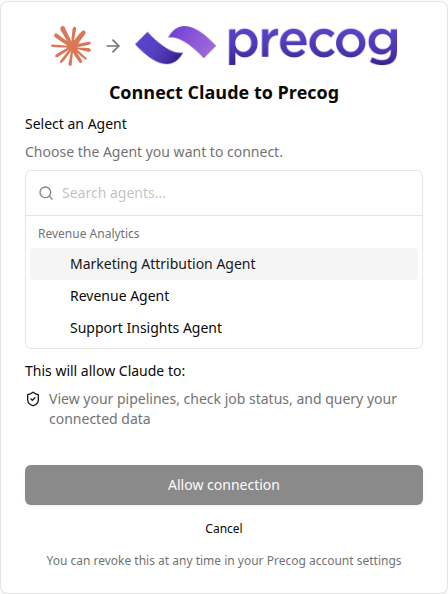
Pick an agent from the list — use the search box to filter by agent, workspace, or organization name — then click Allow connection. The button stays disabled until you have made a choice.
If you only have access to one agent, it is selected for you and the consent screen simply confirms which agent and workspace you are connecting to.
Switching Agents
The connection is bound to the agent you picked. To point an existing connection at a different agent, disconnect the Precog server in your AI client (clearing its stored OAuth state), then reconnect and choose the new agent when the consent screen appears. Signing in again without clearing the stored OAuth state reuses the original binding.
Per-Agent URLs
Each AI Assistant also has its own URL. Use a per-agent URL when you want a client pinned to one agent — for example, a shared configuration where the agent should never change, or when you want several agents available in the same client at once. Connecting to a per-agent URL skips the agent picker entirely.
To find it:
- Open your organization in Precog
- Navigate to Settings → AI Assistants
- Copy the MCP Server URL shown on the assistant's card
You can also find the URL on your assistant's Chat Setup page, which includes a copy button and per-client setup instructions.
A per-agent URL can be used anywhere https://studio.precog.com/mcp appears in the examples below.
Using Multiple Agents in One Client
A single connection talks to one agent, so to use several agents side by side, add one server entry per agent using their per-agent URLs. For example, in Claude Desktop:
{
  "mcpServers": {
    "precog-revenue": {
      "url": "https://studio.precog.com/mcp/srv_a8f3k2m9x1b4"
    },
    "precog-marketing": {
      "url": "https://studio.precog.com/mcp/srv_c1d7e5g2h9j3"
    }
  }
}
Each entry authorizes separately, and because the agent is named in the URL, neither connection shows the agent picker.
Connecting AI Tools
Claude Desktop
Add the following to your Claude Desktop MCP configuration file:
- macOS:
~/Library/Application Support/Claude/claude_desktop_config.json - Windows:
%APPDATA%\Claude\claude_desktop_config.json
{
  "mcpServers": {
    "precog": {
      "url": "https://studio.precog.com/mcp"
    }
  }
}
When you first connect, Claude Desktop will open a browser window for you to sign in to Precog and choose an agent. After authenticating, the connection is established automatically. Authentication is handled via OAuth 2.1 with PKCE — no client credentials or manual token management required.
Cursor
Add the following to your project's .cursor/mcp.json file (create it if it doesn't exist):
{
  "mcpServers": {
    "precog": {
      "url": "https://studio.precog.com/mcp"
    }
  }
}
Cursor handles the OAuth 2.1 sign-in flow automatically when the connection is first established.
GitHub Copilot (VS Code)
Add the following to your project's .vscode/mcp.json file, or add it to your VS Code user settings under mcp.servers for global access:
{
  "servers": {
    "precog": {
      "url": "https://studio.precog.com/mcp"
    }
  }
}
VS Code handles the OAuth 2.1 sign-in flow automatically when you first use the connection.
Gemini CLI
Add the following to your Gemini CLI settings file at ~/.gemini/settings.json:
{
  "mcpServers": {
    "precog": {
      "url": "https://studio.precog.com/mcp"
    }
  }
}
Gemini CLI handles the OAuth 2.1 sign-in flow automatically.
ChatGPT
For help connecting ChatGPT to your Precog MCP server, please contact Precog support. Our team can walk you through the setup for your specific ChatGPT configuration.
Microsoft Copilot Studio
Microsoft Copilot Studio does not support Dynamic Client Registration, so you need to register an OAuth client in Precog before configuring the connection. This section walks through the full setup.
Prerequisites:
- A Microsoft Copilot Studio license with access to a Power Platform environment
- Admin or Owner role in your Precog organization
Step 1: Register an OAuth client in Precog
Follow the steps in Pre-registered OAuth Clients above to create a client. When prompted for the Redirect URI, enter the callback URL provided by Copilot Studio during its MCP connection setup. Copy the Client ID and Client Secret — you will need them in Step 4.
Step 2: Add the MCP server in Copilot Studio
- Open your agent in Copilot Studio
- Navigate to the Tools page in the left sidebar
- Click Add a tool → New tool → Model Context Protocol
Step 3: Configure the server
Fill in the following fields:
- Server name: A label for your reference (e.g., "Precog Data Platform")
- Server URL:
https://studio.precog.com/mcp, or a per-agent URL if this agent should always connect to one specific assistant - Server description: Write this as a routing rule so the agent's orchestrator knows when to use it. For example: "Provides tools for querying Precog data pipelines, including workspace listing, data source and destination inventory, pipeline health monitoring, data freshness checks, and sync error diagnosis. Call this server when users ask about data pipeline status, source configuration, sync schedules, or data freshness."
Step 4: Configure authentication
Select OAuth 2.0 and enter:
| Field | Value |
|---|---|
| Client ID | The Client ID from Step 1 |
| Client Secret | The Client Secret from Step 1 |
| Authorization URL | https://app.precog.com/api/mcp/oauth/authorize |
| Token URL | https://app.precog.com/api/mcp/oauth/token |
| Scope | synesis:mcp |
Step 5: Enable tools
After connecting, Copilot Studio will discover the available tools from the MCP server. You can selectively enable or disable individual tools depending on your agent's purpose.
Note: Copilot Studio requires Streamable HTTP transport. SSE transport is no longer supported by Copilot Studio. Precog's MCP server uses Streamable HTTP by default, so no additional configuration is needed.
For more details on the Copilot Studio setup, see Microsoft's training module: Integrate agents with external systems via MCP.
Other MCP-Compatible Tools
Any tool that supports MCP with OAuth 2.1 can connect using https://studio.precog.com/mcp.
The server publishes OAuth metadata at its .well-known/oauth-authorization-server endpoint, so compliant clients can discover the authorization and token endpoints automatically.
How It Works
When an AI assistant connects to your Precog MCP server:
- Authentication — The client authenticates via OAuth 2.1. Interactive clients open a browser for sign-in and agent selection; machine clients exchange credentials for a token.
- Initialization — The server responds with its identity and available tools. It also loads your organization's context entries to provide tailored instructions.
- Tool Discovery — The assistant receives the list of tools with their schemas and descriptions.
- Tool Calls — When you ask a question like "Is my data fresh?", the assistant calls the appropriate tools (e.g.,
get_data_freshness) and interprets the results.
The agent you select at sign-in lives in a single workspace, and the connection can only see data within that workspace.
Security
- OAuth 2.1 authentication: All connections are authenticated via OAuth 2.1 (authorization code flow for interactive clients, client credentials for machine access)
- Workspace scoping: Each authenticated session is bound to the agent chosen at sign-in and scoped to that agent's workspace; connecting to another workspace requires a separate connection
- Read-only access: MCP tools provide read-only access to your data infrastructure metadata — they cannot modify your sources, destinations, or schedules
- Allowlist control: Organizations must be explicitly enabled for MCP access by a Precog administrator
- Client credential security: Machine client secrets are hashed with argon2id and cannot be retrieved after creation